Monday, April 15, 2024

Thoughts on Using the Wild Country Revo for Both Top Rope Solo and Lead Rope Solo


This is a re-creation of a series of posts I did on the FB Rope Solo list years ago when the Revo first came out. When I changed my FB  identity because of getting hacked, all my posts were lost. This is basically a recreation and archive of the content of those posts. NOTE: I no longer use the Revo, but for those who are dedicated to it, this blog post may prove useful. Climb safe!

~~~~~~~~~~~~


The Revo is a relatively well known self-belay device in rope solo circles that is used as a poor man’s Silent Partner - that is, a bi-directional feed device that operates on the basis of centrifugal force/speed lock to stop rope feed. The main advantages are the ease of feed and the ability to catch head first falls. However, it is seldom used/mentioned as a TR solo device. It’s possible to use if for both LRS and TRS if you’re aware of its limitations and are willing to use it within those constraints. I will not detail the use of it as a LRS device as there is plenty info/resources on that if one searches. This will detail my experiments and limited use of it for TRSing.


First, a bit of background info on the Revo. Functionally it is two separate devices in one. For normal belaying, it is similar to an ATC, where one hand always stays on the brake strand holding it in the event of a fall. The climber’s fall is stopped by the friction of the rope being forced down into both the “V” slots ears. Functionally this is no different than an ATC.


Secondly, the Revo also has a backup system in case the primary system fails. I.e. if the belayer were to lose their grip on the rope and it started zipping through the device. In this scenario, the internal wheel starts spinning and at a certain speed (~4 m/sec), the centrifugal force cause cogs to pivot outward that catch in notches in the body and stop the rotation of the wheel. The wheel is like a narrow “V” groove pulley with internal ridges which provide friction on the rope, stopping it from sliding through the device. This operates independently of the external ears/jaws. 


It is this second function that is of interest for LRS/TRS. The first ATC-like function of the external ears/jaws actually can cause additional friction that impedes the rotational speed of the wheel and thus slightly delays the lock-up. When the Revo is used for TRS these ears/jaws also cause extra friction on the rope which makes the feed less than desirable. (There are other undesirable features but they’ll be covered below at the end of the post).


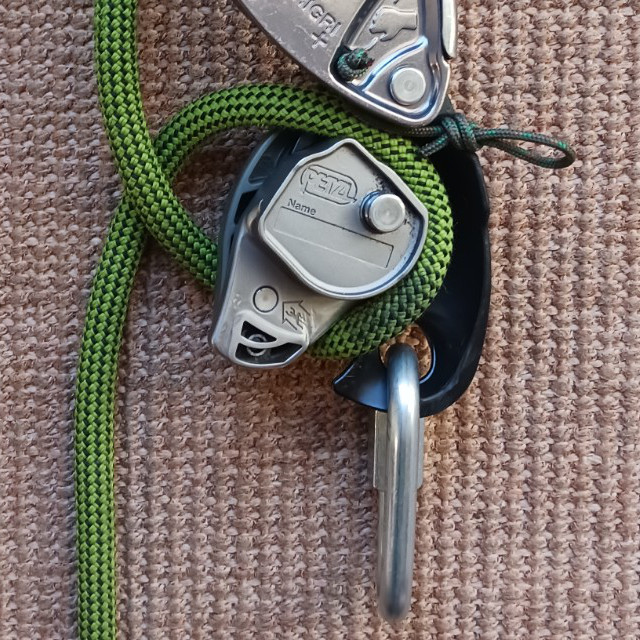
This friction of the jaws on the rope can be mitigated to a degree by having the rope pass through a fat aluminum belay ring as it exits the Revo (see lead photo). This acts as a smooth bearing surface that protects the rope from getting sucked into the jaws and causing friction of the TRS rope feed. This can be easily tested by getting a rappel ring (the fat, totally round cross-section ones work best: https://hownot2.com/products/aluminum-rappel-ring) and stuffing a bight of the rope through it before inserting it into the Revo. 


For TR testing, I used an old 10.1/10.2 rope with some weight on the free rope end. I never tested or used it with a second back-up device - but I always used an occasional back-up knot to keep me off the deck if it failed. I used it for a month or two and found that it fed well enough that I was happy to use it as my my main TRS device - especially for doing laps. If this interests you, test it for yourself and see what you think. It may or may not make a significant difference with skinnier ropes (<9.4) I only tested it with the larger rope.


Drawbacks


There are several drawbacks to using the Revo as a TRS device. Ultimately this is why I moved on to other devices (see my other blog posts other devices I've used). If interested, you should assess its strengths and weaknesses in relation to your routes, goals, style, and risk assessment.


  1. Rappelling: Because the rap ring functions to decrease the friction of the ears/jaws on the rope, this means that it takes an inordinate amount of pressure holding the free strand of rope to keep a controlled decent. There are many ways this can be mitigated such as using a Freino ‘biner; putting a bight of rope around the load strand; putting on an ATC below the Revo; or using a ‘biner and quick link in line to create a makeshift 'biner brake to create additional friction; etc. I'm sure there are other ways also.
  2. There is no immediate lock-up like many TRS devices when weighting or falling on the device because the of the speed actuated lock-up. It takes 3’-4’ to lock up (unless you have modded the internal spring inside the Revo.) This can be disconcerting if that’s what you are used to, if you’re climbing pushing or limits, or if you are climbing on terrain with objective hazards where you want an immediate lock-up. If you’re on overhung terrain and or mainly climbing below your red-point limit, it is less disconcerting once you practice and get use to the delayed lock-up. 
  3. Finally, once locked up and hanging on the Revo, there is the possibility of it unlocking due to the weight of the free rope. This could result in a repetitive lock/unlock situation that while disconcerting, is probably not dangerous in most situations. Only experimentation with it will tell if this will be an issue for you. It depends upon the weight of the free rope which is an interplay of the the height of the climb, size/weight of the rope, and the friction on the rope caused by the terrain (i.e. if less than vertical).

TRS Conclusion:


If you’re interested in just using the Revo for TRS and have tested the rap ring and considered all the factors above, you can stop reading here. If you’re interested in using it for BOTH, TRS and LRS, read on, as there is a modification to the ring that will make it easier to use for both. The modified ring is NOT necessary if you are only going to use it for TRS.


Modifying the rappel ring for LRS


If you also use the Revo for LRS and would like to use the rap ring for TRS, there is a mod that can be performed that will turn the Revo into an “all-in-one-device” by leaving the rappel ring permanently attached to the Revo. Leaving it permanently attached does not interfere with LRS (or TRS).


Steps for modifying the rap ring

  1. Drill a series of holes to make a groove in a 2x4 to hold the ring securely vertically while drilling it. 

  2. Clamp block to drill press to hold it steady.
  3. Drill hole, slightly larger diameter than the cord, that goes through the side of the rappel ring. Getting the hole started is the biggest challenge and might require you to start the hole perpendicular to the ring then turn it 90 deg..

  4. Use a larger drill bit or a conical grinding burr on a Dremel tool to slightly chamfer the edge of the cord hole.
  5. Feed a 6”-8” piece of 2mm accessory cord through the drilled hole in the rappel ring
  6. Tie each end of the cord to each side of the jaw using an overhand knot.
  7. Cut ends close and burn/melt the ends. 

                         
If done as shown in the photos, the cord will be completely out of the way and can’t interfere with the internal Revo wheel and centrifugal lock but allows the ring to hang close to the Revo body when using it in LRS mode and both strands hang down. If you don’t use a cord to hold the rappel ring in place while LRSing, it will slide down the rope and be non-functional and cause other havoc. With it attached, you never have to take the rope out of the Revo when transitioning from LRS/rapping/TRS. You can virtually use the same setup without any changes - something that can’t even be said for the Taz Lov.


Addendum


If you don’t like the idea of attaching the rappel ring “permanently” to the Revo, you can also put a larger loop of cord through it and tie it off in a loop that hangs the ring from the ‘biner. You’ll need to play with the length of the cord to get it just right. I personally did not care for this method as well as the method detailed above.


When using a Revo there are other potential negative considerations such as re the durability of the Revo; potential for shredding the rope sheath during a high factor fall, etc.  These issues are beyond the scope of the this blog and for you to research and assess.


What I would do differently:


Instead of the Revo hanging down from the belay loop, I would attach a chest harness/lanyard to the Revo ‘biner and hold it up. This will keep it from sliding up and down the belay loop and slightly shorten the distance of a fall. It will also hold the Revo higher up so that it will be easier to grab the rope for clipping. In some of the photos you can see some of my experiments for attaching the Revo with a cord directly to the harness and in others the holding the 'biner up on the belay loop with accessory cord.


Monday, February 19, 2024

Further Adventures of: the Trango Vergo for TRS AND LRS


Four years ago I wrote a blog post on the using the Vergo for TRS. This is an update to that blog and new material on using it for LRS also. If you’re not familiar with the Vergo or using it for TRS, I suggest that you read and digest my previous blog first. https://sicgrips.blogspot.com/2020/08/vergo-for-top-rope-soloing.html All the same warnings apply here. The Vergo is not made for rope soloing and the manufacturer has explicitly warned against such use. It will void the warranty, and you could likely be injured or killed by using it beyond the manufacturers design parameters and instructions. With that out of the way, onward. You’re been warned.

In the first part I’d like to update my setup for TRS. In the past I was using a 1.5 - 1.75 accessory cord loop tied around the release handle housing. I was using as small a diameter cord as possible (given what I I had on hand) in order to keep it from rubbing on the side plate as it rotated when locking up. I have since switched to using 1.0-1.1 dyneema. It’s smaller, slicker and stronger. This further insures that it will not rub and interfere with the rotation of the side plate. I tie ~ 2" loop and use a overhand knot, then burn the ends and use a drop of super glue on the knot. The second change I’ve made, is that instead of fixing it to the handle housing, I now either clove of girth hitch it to the small ‘biner/clip that I use to attach the Vergo to the chest harness/sling. It stays attached there and to put it on the Vergo I slip the loop over handle and onto the handle shaft housing. When switching to Lead mode, I take the loop off the hand and leave it attached to the 'biner/clip on the chest harness. This allows for two incremental improvements. 1) it keeps it out of the way when the Vergo is used for LRS and, 2) if the Vergo is used for normal belaying there is one less thing to get in the way. If you are only using the Vergo for TRS and not for LRS or normal belaying, tying it to the handle axle housing as before is still a valid way to go.


The other changes I’ve made to the Vergo TRS system is I’ve gone to using an auto-locking DMM Ceros ‘biner to attach it to my harness and I’m also using Avant Climbing’s Flex-Link anti-crossroad protectors to keep it centered on the ‘biner. https://avantclimbing.com/products/flex-link-anti-crossload-protector This is even more important for LRS and the higher possible forces that can be incurred during a fall.

OK, now onto the main new info. While people have used the Vergo’s predecessor the Cinch for LRS, it was not popular because of some known weaknesses - mainly, there had been some accidents with people using it for normal belaying. Also, it was known that the steel pin that is used for pinching/breaking the rope, was made of a softer steel, that over time, wore down and caused it to slip. Also, the release handle on the Cinch was extremely small and was hard to use due to the amount of pressure needed and the lack of control. These things were all remedied in the latest version of the Vergo. The new hardened steel pin wears extremely well.


(Yann Camus / Bliss Climbing)
Recently I’ve seen renewed interested in using the Vergo for LRS. While there is still much derision by some that it is an inferior device and even dangerous, after seeing a recent Vergo LRS setup my interest was peaked to try using it for LRS. The main piece of info that was missing for me was how to suspend and hold it up so that it that it would feed and lock-up. Using the TRS loop or just letting it hang from belay loop on a ‘biner, both were horrible for LRS feed. On a post on the LRS FB list, one poster suggested that if the plastic thumb button were pried off, it would expose a hole through the hollow axle that a piece of cord could be threaded through, which could then be connected to a chest harness. (this makes it similar to the Cinch.) This allowed it to feed well for LRS. However, their setup appeared awkward and less than optimal to me so I experimented until I came up with the current version seen at the start of the blog and below. With my setup it's easy to transition between LRS and TRS (see below).


The black plastic button can be pried off by carefully by inserting a wide flat blade screwdriver underneath it and gradually twisting the blade. It will pop the clip and plastic rivet off (which can be seen on the inside of the axle). While it won’t hurt the function of the Vergo, and it can still be used for normal belaying, it will permanently remove the thumb rest and you’ll not be able to replace it. After it is removed there will be a 3-4mm hole through the center of the axle/pivot. This will be used to attached a new loop of cord that will be used to connect to a chest harness for LRS. This new connection point give extremely easy rope feed.

I used a 10-12” piece of 3mm cord with the core removed to make the new loop. Strength is not that important since it is only required to hold the device upright while climbing. That means it only needs to hold the weight of the device and rope feeding from the cache loop. It DOES NOT need to hold the weight of a fall - that is held by the ‘biner through the Vergo and belay loop. A 3mm cord without its core when tied with a Water knot is just the right size to be crammed down into the hollow and stay put out of the way. The process looks like this:

Tape both ends of the cord tightly with painters or masking tape. Cut through the taped end of the cord to give a clean cut.


Take off tape from each end and pull the core out.


Tie an overhand knot about 2" from end of cord then insert the cord through hole in the Vergo so the knot is on the gray steel side of the Vergo. (These photos were taken with a piece of cord after I had already threaded and rigged mine up.)


Rethread the other end through the knot in the opposite direction of the overhand knot. (This makes it a Water knot.) Dress the knot so that it makes approximately a 2” diameter loop


Cut the end of the rope that will be facing inside the hollow so it’s about 1/2” and burn the end until it turns into a molten blob and acts as a stopper for the knot.


After it cools, jam the knot down into the hollow and seat it down in as far as possible.
Cut the outside end short and burn it to form a molten stopper blob. The end result should look like this with a smooth loop of cord and the knot hidden out of the way:


My current setup looks like this:

                              LEAD mode

                      TR mode

Climbing with the Vergo looks like this:
  1. Climb route 
  2. At top of route fix the rope to the anchor
  3. Undo MT if used for a cache loop
  4. Rappel on Vergo and pull gear
  5. On ground (or at previous anchor) unclip Vergo from chest harness
  6. Flip Vergo and rope 180 deg. and attach TRS Dyneema loop over the handle so that it is around the steel handle housing.
  7. Reattach 'biner to the belay loop, and
  8. Weight rope and climb back up to anchor in TRS mode.
At this stage I have not taken any real whippers on it - just short little test falls. I'm from the generation where the ethos was that you climbed at a level where you don't expect to fall. I'll leave it to you young'ns who are used to whipping while projecting, so please do judicious testing with this setup. Be careful out there!

Many people who use a GG, Vergo, Cinch other other improvised device for LRS, often have a fairly taught connection between the belay loop and chest harness. I usually run mine so it's less taught so that the belay loop 'biner is almost slightly free hanging within the belay loop. Initial tests have shown that it might possibly be able to lock up during a headfirst fall if the connection goes slightly slack. This will require further testing with it rigged to a dummy weight and shoved backwards off a cliff. Should this prove reliable, it could be the first device that would allow TRS/ LRS/ and headfirst fall protection. Note however, that this is at the conjecture and initial testing stages, so don't count on it. Even if further testing shows it likely to lock-up in a headfirst fall, there should always still be a reliable backup of some type.

Since I consider all this experimental, I'd appreciate any thoughts and experiences you have if you try a similar to this setup. All my experimenting with the Vergo has been with 9.4 - 9.5 ropes. It would be interesting to see how this setup works with small ropes from 8.5 to 9.2. If you experiment with small ropes, do so cautiously. Please post any comments below. Thanks!


Warning: If using knots as a backup with the Vergo, they should be either anchored to the harness / full strength gear loop, or, if on the free line below, they should pass through a quick link on the belay loop or auxiliary belay loop. If not, the knot will jam against the Vergo and because of the nature of the design, it could cause the two halves to blow apart in a high factor fall. This has NOT been observed but IMO this preventative measure should be taken. However everyone's risk factor varies.

Sunday, May 28, 2023

Grip-Brick Hold Positions

Photos show the versatility of the GripBrick and the various positions that can be achieved by positioning and adjusting the cord. 

As of May I have a number of grips left that I'm selling at $15/grip + shipping. If interested contact me at sic dot grips at gmail dot com.

GripBricks can be used singly or in pairs and can be used with free weights, weight machines, hanging, or clipped to a knotted sling shut in a doorway to provide a horizontal pull at waist height. I most frequently use them to warm up at the crag or to do strength training one arm at a time with isometric pulls of ~5 secs slowly increasing and decreasing the pull to max strength.

The following two photos show how a girth hitch around the cord knot can be used to adjust the elliptical small and large crimps for positivity and finger contact area.


Thursday, January 26, 2023

El TacaƱo

El TacaƱo - GriGri Mods for
Lead Rope Solo

(The Cheapskate)
[updated 25 May, '23]

This is a summary of all my experiments and tinkering with modifying the GG for LRS. The naming is a nod to the El Mudo because it has the same basic functionality. If you aren’t a tinkerer and want the same functionality, then buy an El Mudo and support it's designer who is serving our community by constantly improving his design. It is a quality, bomber device made specifically for LRS and is probably the safest device available (with a back-up), and is reasonably priced compared to finding a used Soloist or Silent Partner at current eBay prices.

All my mods for LRS are way beyond the manufacture's designed purpose and will void any warranties; it may ruin your device; and are most likely dangerous for the inexperienced.

The goal of my tinkering is: better feed and immediate lock-up during weighting/falls. Said another way: I want it to be transparent in its feed and to be safe. I’m an old fart and risk adverse so I have no shame in setting a piece or clipping a bolt and hanging - I'm more into mileage and having fun than pushing myself then pushing my limits and getting something 'clean'. Given that, I do want to know that it's going to immediately lock-up. El TacaƱo mods are good for minimizing fall distance on routes with objective hazards and /or cruxes low to ground. I'll leave the cutting edge stuff and big whippers to those like Brent Barghahn and Keita Kurkami who use similar systems but without some of the safety I've incorporated into my mods.

If none of my reasons apply to you...move along...just use a stock inverted GG 1, 2, or 3 which doesn't require any mods and 'should feed well'; 'should lock-up'. Note: none of these will lock up in a head-first fall so a backup is mandatory

The following are 5 major versions of the mods starting with the easiest and least "destructive" of the stock GG. The degree of difficulty of the mods is directly proportional to the functionality of the device (ease of feed and immediate lock up):

1) GG+* - 2-strand HUB cord, (set to TR mode) 

Feeds best with smaller diameter ropes, < 9.6 to mitigate friction. 2-Strand HUB cord - (Held Upside-down and Backwards) for connection to a chest harness. With this setup and the GG+ set to the top rope mode, it’s easier to lock up because it doesn’t have to flip up from hanging to vertical position. It's also easier for the climber to pull more rope for clipping because of higher position in relation to one’s body. This mod only requires one 1/8” hole to be drilled in pivoting side cover which doesn't weaken the GG; and doesn’t rely on holes in the plastic; no sharp edges; and keeps it away from handle. It can still be used for normal belaying. Allows centering of GG (side to side) and adjustment of the hang angle determined by where the overhand tow-loop is tied. 

Because the rope tab on the cam arm puts an "S" bend in the rope, the 2-strand HUB cord allows you to fine tune and adjust the angle for the least possible friction possible with a given rope. It's a simple matter of re-tying the knot for the chest harness hang loop and adjusting the length of the arms to change the GG+ angle of hang. If the GG+ is oriented close to vertical, the rope friction can be too great. Close to horizontal there is little rope friction - almost too good as the back-feed can become as issue. Also, in this position it can lock up if you're climbing too fast or pull rope up instead of down to clip. The middle photo where it hangs at 45-50 deg. and slightly rubs on the rope tab gives a good middle ground. It can be a bit finicky to set it initially set up and use but it's easy to make adjustments. 


Even though the spring in the GG+ is set to the TR mode it is quite weak but still requires a deliberate weighting on the rope to overcome the spring. I have heard of a some instances of it not locking up from a slow weighting from a high-clip position. Be sure to test on the ground and become familiar with the interplay of rope diameter and slow lock-up.  This is what lead to #2 below where I disable the spring (GG3) and eliminate that possibility.


2) GG3 - 2-strand HUB cord; deactivated spring.
Feeds best with smaller diameter ropes, < 9.6 to mitigate friction. This uses the same 2-strand HUB setup as above but uses a GG# in which the spring is Deactivated which allows the cam arm to pivot and lock on rope with the least downward movement of the climber. High clipping and/or “sitting” on the rope will always immediately lock-up. With the HUB cord there is no problem with the GG locking up. Because it’s held up vertically the rope feed is down away from locked position. However one needs to remember to pull slack down before clipping.However this is usually a natural action when leading - ‘pull down - clip up’. Should you pull directly up to do a high clip, it will immediately lock on you because of the deactivated spring.


3) GG3 - 2-strand HUB cord; deactivated spring; and ground down modified rope tab:
The modified rope tab decreases the “S” bend in the rope which causes friction. This mod still protects against the rope getting caught underneath the cam arm because the tab is still functional though reduced in size. It is helpful to use in conjunction with 2-strand HUB cord to fine tune hang angle for most efficient feed.


4) GG+ - single HUB cord; ground-off rope tab; CAS (Cam Arm Shield), set to TR mode. 

Here I switched to a 1-strand HUB cord. Simpler to set up and  holds GG closer to vertical. Because there is no rope tab it's not as critical to keep it at an optimal angle. With the 1-strand HUB cord it leans slightly because the one strand is a bit offset from the center of gravity of the GG. This might increase the drag slightly but is helpful in keeping the cord and chest harness connection away from GG handle - and it's also simpler to put on and take off. 
Because it’s using a GG+ the lock-up isn't as immediate as #2 and #3 above because it still has to overcome the spring in the TR mode. 


A CAS (Cam Arm Shield) was also created because the standard GG rope tab is ground completely off to give a straighter rope path and decrease rope feed friction. Because of the tab is hollow, it leaves several small holes through to the guts of the handle. The CAS seals this off so nothing can get in to jam up the handle.
Without a CAS there is a risk of the rope getting caught underneath the cam arm and slicing the rope during a fall as shown to the right. The CAS is designed to make that an impossibility. It is fashioned out of a small piece of 25 gauge (0.5 mm) 304 stainless steel and JB Weld steel epoxy is used to glue it to the cam arm. This version is the smoothest feeding systems possible with a GG and is better than any other LRS system that I’ve tried which includes all the major LRS devices…it’s just unfortunate that it has the anti-panic handle - but I suppose if one wanted the best feeding GG for LRS, they could learn to live with and become efficient at using the anti-panic handle.

The following photo shows the cam arm shield before being attached with steel epoxy. It was a bit too wide so I eventually cut the width down after I'd already bent it and held it in place to see how it fit. A bit of trial and error.


Chamfered hole for the HUB cord. Since the photo was taken I have changed to drilling the hole on the sloping face just below where it is shown. This causes the cord to better exit at an angle between the cover and body into the existing gap between cover and body of the GG. This saves having to file the plastic spacer to create better clearance for the cord.


5) GG3 - single HUB cord, deactivated spring; ground-off rope tab; CAS (cam arm shield)
 

This version uses a GG3 and has the spring deactivated like in #s 2 and 3 above. However it has the rope tab on the cam arm completely ground off like #4 above. It also has a CAS with a new rope guide tab. This is necessary because with no spring resistance, when the rope feeds through around the cam, it tends to rotate it and which starts the locking-up process on the rope causing friction. This ultimately defeats the purpose of grinding off the tab in the first place. By incorporating a new rope tab into the CAS, the rope path can be straightened out, allowing for a straighter rope path than in #3. However, in the long run I think it’s not worth the extra work because the gains in friction reduction are minimal over #3 above.  If one wanted the best feed possible in a GG for LRS, then #4 above is the choice. I haven't actually used this one yet but preliminary tests at home have convinced me that it it not worth the extra work even though it would seem the ultimate in rope feed and instant lock up. 


Additional mods:
The pivoting side plate was trimmed slightly and the edges were chamfered to increase opening clearance to decrease rope drag. This mod only applies to 3), 4) and 5) above. This is a minor mod but depending upon rope used, it can help with reducing the rope drag as well as provide a smoother and much more rounded opening where the rope will be rubbing when changing directions from feeding down while climbing, to pulling up during a fall. 


On several of the GGs, I shortened the length of GG handle by 3/8” - 1/2”. This provides more clearance of handle when cam arm pivots so it is less likely to catch on anything. It's interesting to note that the latest version of the Petzl Grillion (a version of the Grigri without a spring for use in an adjustable lanyard for rope work), also has a shorter handle than the GGs do. When the handle is shortened, it leaves a raw I-beam edge on the end that I filled with epoxy and then rounded and smoothed. For my small-medium fingers, it still leaves enough space to get 3 fingers on the handle to easily control the rap. I've never had an issue with handle interference so this is more of a preventative measure.

There you have it. Five major GG mods done over several years. It's kind of anal in scope and detail but then that's what I do. My favorites are #3 and #4 above though they all work.

LINKS

_________________
GG+* - while many people (including me) don't care for the anti-panic handle, and while it is a scourge for an experienced user, for those who want to make the most minimal modification to a GG and want to try a "safe" way to LRS (2-strand HUB cord), the GG+'s dual spring mode provides an acceptable way to try it out IMO. It should be set to the weak-spring (Top Rope) mode.

Note: While some of the photos often show an aluminum 'biner (which was handy to grab when shooting these photos), when actually using the El TacaƱo I use a locking steel 'biner or a rated SS quick link.

Note 2: At some point I would love to take a couple of these and a weighted duffle/haul bag so it was rigged like a climber then push it over backwards off the top of a local cliff. This would simulate what a typical head-first fall might be like. It is typically said that a HUB rigged GGs won't catch a head first fall without a back-up. It could be tested both with and without a backup. Anyway, maybe in the future.